
Coupons.com provided us with a Home Depot gift card to pay for the materials we used for this project.


I was very excited when I got the chance to participate in this fall project collaboration, in large part because it came with a deadline, and me and deadlines get along very well. Me and “finish it whenever you get a chance, self: I know how busy you are!” are good friends, too, but not as productive friends. We’re the kind of friends who sit around and watch TV all night and drink more wine than we meant to.
So Coupons.com was kind enough to send a few of us bloggers gift cards to Home Depot or Amazon to use to complete a fall project. Did you know that you can use Coupons.com to search for all kinds of discounts to a gazillion different stores, not just for grocery coupons? I’d had no idea, although I’d been using it and loving it for years for printing out grocery coupons. But, yeah, it’s all right there! Printable grocery coupons AND coupon codes and discounts for places like….well, like Home Depot and Amazon. And thousands of other places (not really a gazillion. That’s not a real number).
My first vision of this post was a wee bit more ambitious than what you see before you. It involved a very elaborate entire front porch makeover, complete with a painted door and a house number plaque and maybe a DIY door mat of some sort for good measure.
Then we realized that thinking we’d be able to get all that done was completely nuts, and we made these planter boxes and called it a day. Really, we’re still planning on all the other stuff (and the leftover paint from this project will play into it, but I won’t say exactly where, so as to leave some surprises). But time goes by surprisingly quickly, and it’s been way too hot and humid to paint a door anyway.
I’m not going to give a detailed tutorial for how we made the planters, because we pretty much followed these plans from Ana White. Only we didn’t use the finials, mostly because we couldn’t find ones that looked like the ones they used, and we were kind of undecided about whether we wanted them or not anyway, so that decided for us.
These were pretty simple to put together and would be a great first project for someone who just got a Kreg Jig and is looking for something to knock out in a day. That said, we managed to mess them up a little. Dave made a diagram to show how:

This is how the planter was supposed to look….with the side boards lined up with the inside of the corner posts.

Instead, it wound up more like this. This was not just an aesthetic problem, it meant that the slats for the bottom were too short to fit. So Dave had to hammer in an extra little board for them to rest on:
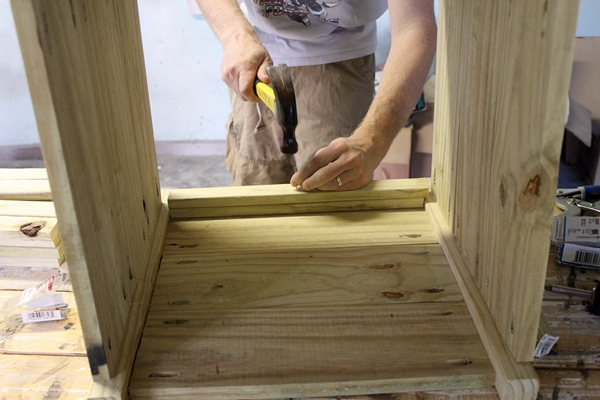
But then everything was okay.
I even helped with the woodworking part of this a little. Dave was headed out to the store, and I said, “maybe I’ll work on these a little!” My little part involved screwing together some already Kreg Jigged boards. Dave showed me how to do it, and, by the time he was ready to leave, it was not going terribly well. “Do you feel like you’re getting the hang of it?” he asked.
“No, I wouldn’t say that,” I said.
“Okay, bye,” said Dave.
“What do we do when I completely screw this up?” I asked him.
“We buy more wood,” he told me.
“I kind of have a deadline here,” I said, “don’t you think it’s a little irresponsible of you to let me completely mess up my project when I have a deadline?”
But it all worked out, and we didn’t even need more wood.
I wanted to do some kind of seasonal fall/Halloween design on these, with the idea that they can then be turned around to the blank side for the rest of the year and be season-neutral. I’m planning on a Edgar Allan Poe/Raven heavy theme for Halloween around here, so ravens seemed like a natural choice.
I considered making a stencil, but I have an irrational fear of stenciling, so I ended up sketching a raven outline and then tracing it onto the boxes. I just googled images of ravens; they’re all black, so it’s pretty easy to make them outline-y.
Both the paint for the boxes and for the ravens is semi-gloss exterior latex from Behr. I picked a lighter gray for the boxes and then a deep charcoal gray from the same card for the ravens. I did one coat of the light gray, let them dry, then set to work on the ravens.
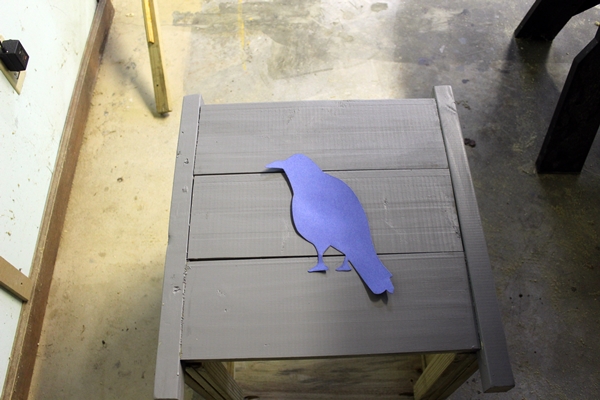
After I traced around them with pencil, I filled them in with the two coats of the dark gray paint (using little craft brushes). It occurred to me far too late that I probably should have had them facing opposite directions. Oh well.
The next day, when everything was dry, we hauled them out onto the front porch, lined them with cardboard:
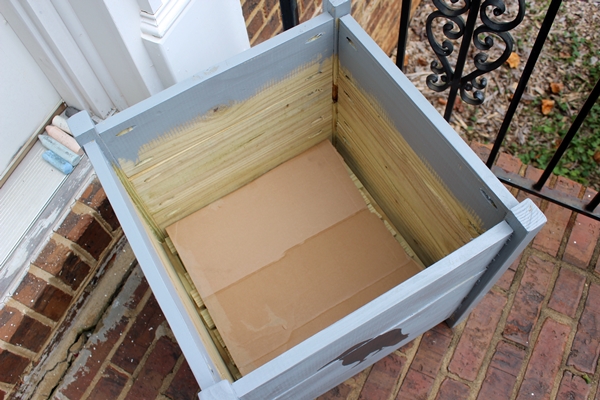
Then filled them up (with mulch from our never ending mulch pile and then with a combo of potting soil and compost on top) and stuck some mums (which were on sale, four for $10 at Home Depot) in there. And then they looked like this:


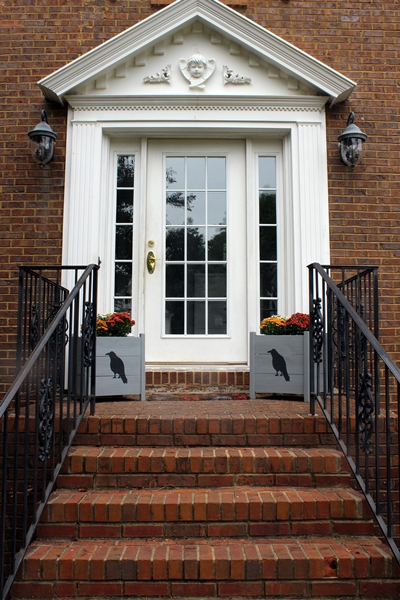
(I was going to show you what they look like turned around and de-Halloween-ified, but turns out they’re really heavy once they’re full of dirt. I’m not turning them around just for a picture. Take my word for it: no ravens on the other side!)
Now try to picture it with a freshly painted door and shiny new house numbers!
And now for some EXTRA FUN! There are eight other bloggers who are also showing off their fall projects today. I’ve seen a few sneaky instagram/facebook glimpses of some of them, but for the most part I have no idea what they are, and I’m very excited to see them all. So make sure to hop over to these other blogs and see what everyone else has come up with.
Here we all are, looking very happy about our fall projects:

….and here’s where you can find everyone:

Sharing with:
The Inspiration Gallery
I love these. Is there a pattern for the raven, please?
Thanks, Dorothy! Sorry–there’s not a pattern. I just looked up some ravens online and sketched one out, then traced around it. If you’re not comfortable free handing it, I bet you could find a basic outline to print and then cut it and trace around it. HTH!
is there a pattern for raven love this project
Thank you! Sad to say, there’s not a pattern. I drew the raven by hand, based on some outlines I found online.