

I know that there are approximately 80 gazillion tutorials out there for how to make your very own DIY coasters out of 16 cent tiles from Lowes….but I think maybe the reason for this is that coasters are actually pretty useful (like, if I had any, I wouldn’t always have to grab a random scrap of paper to put my glass on on my dining room table), and even if you have some it’s always okay to have more because they don’t take up much space, and these are super easy and cheap to make, and if the person you give them to doesn’t like them it’s really easy for them to stick them in a drawer somewhere and only pull them out when you come over! Yay!
So I decided awhile back that coasters would be the perfect present for the kids to make for assorted friends and relatives this Christmas. And when I saw that the theme of week 3 of the Dare to DIY challenge would be “give handmade,” it gave me an extra kick in the butt to get going with that already.
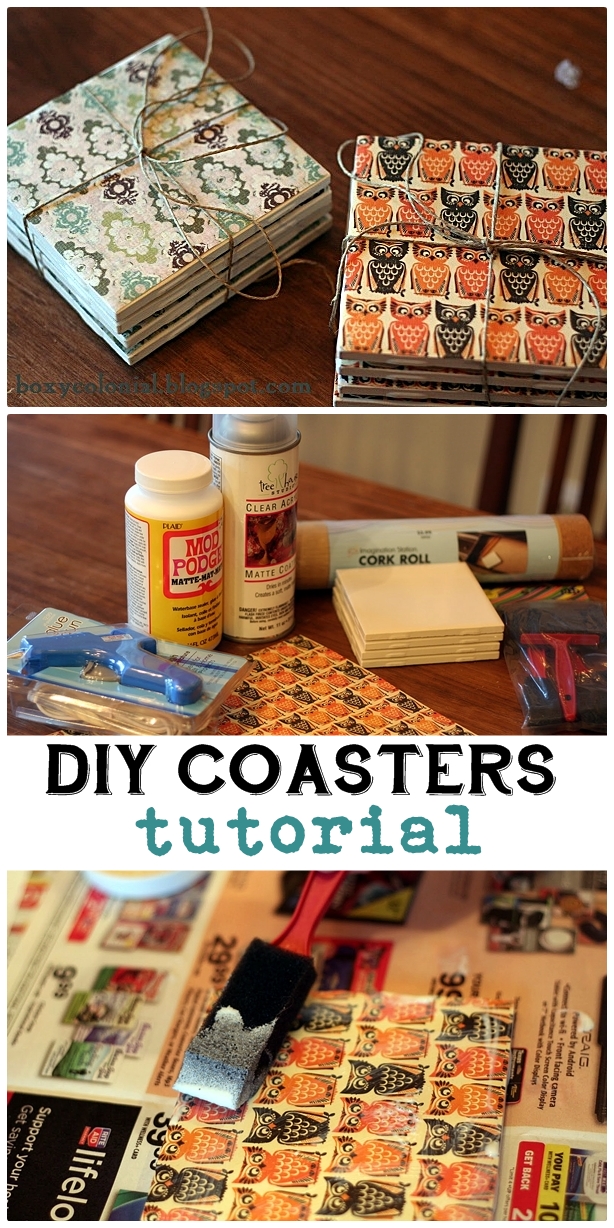
So here is the coaster tutorial to end nicely complement all other coaster tutorials! But how many of them have OWLS?! Maybe a few; I don’t know. If you are reading this and you think you might be the person receiving owl coasters, just put that thought right out of your head. You are WRONG!

So first you go to Hobby Lobby, your new favorite store (or to Amazon, where these affiliate links will take you), and you purchase:
*scrapbook paper (I don’t think mine’s available any more, but how about these woodland animals instead? Or these Christmas prints?
*Mod Podge (I got matte, but you can get the shiny stuff if you want. It’s up to you!)
* Spray Acrylic Sealer (again, I went with matte)
*Foam Brushes
*a glue gun, if you are new to craftiness and don’t already have one
*roll of thin cork (according to the other tutorials, you can also use dots of felt)
Then you go to Lowes and get a bunch of white “biscuit” tile for 16 cents a square. This might get more expensive when your kids see the Gatorade and want some. Especially if one of them is getting over strep. He’ll insist he NEEDS one because he’s SICK. And then you’ll spend more on Gatorade than on tile, but that’s okay. Because you love your children and want them to be quiet happy.
ETA: If you can’t find the tiles or just want to make getting things together a little easier, I just came across this kit on Amazon that puts the tiles and most of the other materials you’ll need together for you.

Trace around the tiles on the back of the scrapbook paper and cut out a square. I found out after this that, even if you don’t want a border for aesthetic reasons, it’s best not to go all the way to the edges or you’ll wind up with paper overhanging that’s hard to get all sealed in with the Mod Podge and whatnot.

Put a layer of Mod Podge on the tile, and then put the scrapbook paper on and quickly get it just how you want it. Then put another layer of Mod Podge on top. The Mod Podging is a great job for your almost 7 year old!

Wait 10 minutes or so for the first layer to dry, then put another layer on (waiting for things to dry is the primary time suck in this project). It will look like this at first, but don’t worry: it dries clear!

Like this!

Then go to work with your acrylic sealer (outside). I did 3 coats, and you’re supposed to do them, according to the label, 2 minutes apart. Which is too long for impatient people like me to just stand there, but too short to actually do something else. I might not have made it to two whole minutes. Then you’re supposed to let it dry for 24 hours before handling, but that’s ridiculous. I’ll bet NOBODY waits that long!

Next you whip out your new $2.99 glue gun, cut out a square of cork (the cork I bought was self adhesive, but I didn’t trust the built in adhesion to do the job by itself), and glue that sucker down. Another fun job for kids. Hot glue! What could be more fun?!

Mod Podging!


Hot glue!

We still have a bunch more sets to make, but here are the first two, all finished!
Let’s call this the homeschool post for the week, too. Multi-tasking!
Maybe you would like to pin this?

More Holiday Crafting:


Sharing at the Dare to DIY party hosted by: Decor and the Dog, Maybe Matilda, Newly Woodwards, and TwoTwentyOne
And also with: Tuesday’s Treasures at My Uncommon Slice of Suburbia, Hookin’ Up With House of Hepworths, Somewhat Simple, Chic on a Shoestring Decorating’s Flaunt It Friday, The Shabby Nest’s Frugal Friday
SO CUTE. And your boys are adorable. Even if they’re needing Gatorade. I might steal this gift idea..I have lots of DIY gifts I need to finish still. Thanks for the inspiration!
Thanks! Looking back, I think they should have saved the Gatorade to drink while we were waiting for things to dry. You should try that and report back!
I’m dying over that owl paper. Great gift idea. Who can’t use more coasters? Thanks for joining the Dare to DIY again this week!
Thanks for hosting…I wouldn’t have done these until the 23rd otherwise 😉
These look great! Love that you got the kids involved. Sarah
thanks!
Gretchen I LOVE it! Those turned out so cute! The owls are darling. Gotta take advantage of free (almost free… the price of gatorade. A fair wage) labor where you can!
Thanks! I think it’s the kind of labor where it’d be faster to do it myself, but hopefully it’s instilling some sort of work ethic or something anyway….
I made coasters for Christmas last year so I obviously love this idea! The paper you picked out is so cute, great job!
Thanks–picking out the paper was my favorite part 🙂
These are such a great gift idea! Who doesn’t need pretty coasters?
Thanks for linking up to Dare to DIY!
See but all the others did not make THESE coasters, with THESE papers AND got all their kids involved as well 🙂 I really like what you did here! Awesome!!
I agree with K! Yours are adorable, and I love the pics of the kiddos getting involved. I was going to make these for my DIY gift, but I never made it to the hardware store to get tiles. I still plan on making some for gifts though! Thanks for sharing =)
Put those boys to work! I love it! The owl paper is too cute as a coaster!
These are so so cute! I am thinking I need to do these for my grandparents-in-law. Picutres of the kids maybe…and I think some owls would be cute for my sister-in-law!
I’ve seen a bunch with photos online–I bet the grandparents would LOVE them 🙂
These look great and I love the fact that you got your boys involved in the crafting! I’m totally going to steal this idea for my mother-in-law’s Christmas gift (I’ll leave the hot gluing to myself but my 2.5 year old could totally handle some mod podge)!
ha–yes, 2.5 is probably a little young for hot glue. Maybe next time!
this craft is awesomely easy – i made a whole slew of these coasters a few months back. my favorite part of your is the OWL paper you chose!! ps – found you through the dare to diy challenge 🙂
Thanks for stopping by!
I’m going to steal this too for my MIL and Aunt gifts! I love them, they turned out so great! Imagine my dismay when I learned that I won’t be receiving them. D:
While you won’t be receiving them, you might just know someone who will. But I think she doesn’t read my blog, and her reward is not ruining her teacher present Christmas surprise.
Okay… I’m feeling a little inept since I am always such a train wreck with the Mod Podge and you’ve got your 7 year old working it. But this is such a fun idea, I’ll give it a go again. Thanks for sharing!
ha! well, he’s a very confident 7 year old; it would never occur to him that he would have any trouble 😉
Super cute! I don’t use coasters, but I like these anyway 🙂
thanks!
Awww! These are adorable little coaster sets! I love all things owls, and so I love these! So cute!
Owls make everything better, don’t they? 🙂
Such a lovely idea! I love coasters but, I haven’t tried making it. Now, after seeing this, I’ll grab some materials later and me and my kids will try to make this too. 🙂 – http://www.jrsalescorp.com
Those turned out awesome! I will need to try this.
Super cute! How do they hold up under moisture from drinks?
Honestly, we never ended up making any to keep for ourselves, so I have no first hand knowledge! But, I do see a couple of the sets we made for other people on a regular basis, and, as far as I can tell, they’re holding up well 🙂
Pingback: Tile Coasters | Butterfly Kisses
Can photos be used in place of the scrapbook paper?
I haven’t tried that, but I don’t see why not :). I’ve seen where other people have done it and gotten good results
I love these, I just found your blog an made my own coasters. My have set for a few days now and our glasses are sticking to the coaster, but the tiles don’t feel sticky. Did you notice this happening with your tiles?
Hmm….I didn’t notice that with ours. I wonder if an another coat of the spray sealant would help? Or maybe just letting them sort of cure for a few extra days?
I had the trouble with sticking also so I put my brain to use.lol I went to Autozone and bought a can of clear engine sealant ( great for the hot coffee cups). 3 light coats then bake to cure. Time is on the can. Works like a charm,no sticking!
great idea!
Can youbuse regular pictures instead of scrapbook pAPER?
I thought I responded to this the other day, but it’s not showing up now! I haven’t tried that, but I’ve seen where other people have done it with good results, so seems like it would work fine!
Can you use fabric instead of paper?
I haven’t tried that….I would guess that a thin fabric would work fine as long as you use enough mod podge. I bet if ou google you could find some tutorials out there where people have made them with fabric to get some tips 🙂
Pingback: 50 Gifts for Genealogists – 2014 | One Rhode Island Family
I have been researching coaster tutorials for a few months and this is by far the best! I’m starting my sets now! Thanks
Thanks so much, Fatima–that’s great to hear! Have fun coaster making 🙂
Pingback: A Quick Gift for Mom and Dad | One Rhode Island Family
Hi there,
I live in Alberta Canada and cannot seem to find these tiles at any home improvement store so I ended up buying some from a smaller company which cost me a lot more… Anyways, my question is whether your tiles had a glossy finish on them? If so did you just modge podge over? Someone mentioned sanding them a bit..?
honestly, it’s been 2 years now since we made them, and I really can’t remember! I just checked lowe’s website, and it looks like they sell them in either matte or glossy, so I’m GUESSING I would have picked the matte ones. I would think that mod podging over the glossy ones would also work fine, though…but again, just a guess. Sorry I can’t be more help!
Hi, I found some tiles that already had an ugly design on top at the Dollar Store, for obviously a $1. Don’t know if you have those stores in Canada but they worked great for me and already had the cork on them.
ooh, great idea–thanks for the tip!
Pingback: Christmas Gifts On A Budget | The Mommy List, Week 3 - kayse pratt
Pingback: 8 Holiday Gifts You Can Make | Lisa Van Dore Real Estate
Is the acrylic sealer absolutely Necessary ? i can’t seem to find that product.
I can’t say for sure since I’ve only done it with it…it’s possible the mod podge would protect them enough. They should have the sealant at any Michaels or Hobby Lobby or other craft store. or you could also brush on polycrylic from a can (from home depot or wherever)….I think it’s the same stuff but in spray form. good luck!
I saw another person comment that the drinks were sticking to the coasters and I’m having the same problem with mine. Has anyone figured out how to fix this issue?
Sorry you’re having trouble, Kadie! I’m not sure what else you could do, other than maybe a couple extra coats of the spray sealant?
I made 4 sets, and the recipients loved them. For myself, I stamped a quote on the scrapbook paper and let it dry before beginning the process. I love how it turned out. Thank you for sharing your tutorial.
Oh, that’s great to hear! And great idea about stamping the scrapbook paper 🙂
I made a BUNCH of these last year. I did NOT seal them with anything because I didn’t know I was suppose to & it WAS NOT a good thing!!! They cured for weeks by the way. When I stacked them up they all stuck together & ended up destroying the paper. What a waste! I had made SO SO many 🙁 A friend recently made them & put water-based polyurethane as a sealer so– I’m gonna TRY IT AGAIN….cause I love them!!
Oh no! Sorry your first batch didn’t last….better luck this time!
Has anyone had any issues with the acrylic sealer “yellowing” their photos? I actually doing this project now and my husband said he has heard of it causing it to turn yellow over time.
I checked in on one of these sets when I was at the friend we made them for’s house the other day (she got the owls), and they appear to be holding up well….no yellowing that I noticed. In my experience with painting furniture, you use polycrylic instead of polyurethene when you’re going over light paint specifically to avoid yellowing, so it would seem like the acrylic sealant would be pretty safe. That said, I haven’t used photos for coasters, so I can’t say for sure!
Ok thank you! Maybe they will be ok!
Pingback: Easy DIY Christmas Coasters (to do over Thanksgiving break with the kiddos)!
I just refinished an old coffee table that I didn’t used to care what happened to it because it’s been around for so long and my kids pretty much scratched it, colored on it, even nail polish was on it. It was a mess…but I was determined to make it a gem again. So after alot of sanding and sanding and sanding I got everything off, even the deep scratches and nail polish. That was the hardest part. My table is beautiful and I have threatened that if anyone gets water marks or a scratch on it, they will have my wrath. So, with all that being said, I am making coasters and using them for the first time. My kids are older now and wont use them as hockey pucks! Yay. the owls are adorable. I hope I can find some. Thanks!
I tried to track down the owls on Amazon to link to, but I couldn’t find them…hope they’re still out there somewhere for you! Thanks so much for stopping by 🙂
I just had these wonderful coasters.pop up on my Pinterest. I have a friend (grown man) who loves Bateman. Do you think this would work with comic book pages? Thank you
That’s Batman.
I haven’t tried it, but I don’t see why not! I’d say you might just need to be extra careful handling the paper and be really generous with the mod podge, since it’s a thinner paper.
How do you not get brush marks?
Well, using a foam brush helps with that, but they probably weren’t perfect….I’m okay with not quite perfect in most things 🙂
I’ve made lots of coasters but never with the paper & these are gorgeous. I’ve always rubber-stamped images and colored them with markers or coloring pencils. Finished with spraying the sealer. That being said—ÑONE have ever yellowed. and the 1st ones made was 2008.
Thanks, Kellie! And good to know the sealer doesn’t yellow over time 🙂
Pingback: 50 DIY Projects You can Make in Under an Hour - DIY Joy
Do you know how to prevent the cups from creating a suction on the coaster?
All of mine went out as gifts, so I don’t have much experience with using them after making them. I wonder if just a thicker finish/more mod podge would help?
Pingback: DIY coasters | the sugar, plum, dairy
Hi Gretchen, I’ve been on a quest in my area to find some inexpensive tiles to try this project, but all that I find are either almost $1 a piece or glazed, are yours glazed or unglazed? I’m worried the mod podge won’t stick right if I try to use glazed/glossy ones. I also can’t seem to find reference to “biscuit tiles” anywhere except for non-square tiles.
It’s been so long now that I honestly can’t remember if they were glazed or matte–sorry! I want to say they were matte, but it’s really just a guess. I would think the mod podge would stick well to either, though. I like to think that I’ve gotten better about documenting what I use in detail since this post 🙂 I’m not sure what to to tell you about the tile….I found mine at Lowes in the section with all the other tile; they had tons of them there and you could buy a bunch of them in a box or loose individual tiles for 16 cents…but it’s been nearly 3 years, so it’s certainly possible they don’t stock the same ones anymore. Sorry I can’t be more help!
Hi Traci. I read your question about tile prices. If you have a Habitat for Humanity Restore, that would be the place to look. I bought 4 4×4 tiles and one 6×6 for about .79 total. They were having a 50% off sale on all tiles. They were just plane white glossy and my pictures stuck just fine. I think biscuit is the color…They had all kinds of colors, sizes and styles. I hope this helped.
Wow this just made my day! Can’t wait to try this one out, and just love your commentary on everything lol too funny!!! Love it!
Thanks so much, Ashley! Have fun with your coasters 🙂
Thanks so much for the tutorial. Where did you purchase the acrylic sealer? Is it essential that it be “outdoor”?
I believe I bought it at Hobby Lobby (there’s a link to the same stuff I bought on Amazon in the post). I don’t think it has to be that specific one or say “outdoor,” though–that’s just what I found at the store. HTH!
Pingback: 11 DIY Projects for a Craft Fair and what to charge!
Your tutorial was terrifically entertaining and educational! Not to mention your kids are adorable. EVERYBODY is getting coasters this year! !
Thanks so much! Have fun making coasters 🙂
Pingback: DIY Gift Idea Round Up -Can't Talk
Pingback: Easy and Budget Friendly DIY Gifts - Noted List
Pingback: Homemade Christmas Gift Roundup - Living a Warrior Life
Pingback: Ingenious DIY Projects to Make in Under an Hour
After you add the cork on the bottom, do you spray them down with adhesive or is that the finished product? I really enjoy this thank you.
Gluing the cork down was my last step; I did all the adhesive and sealant for the tile and scrapbook paper before adding the cork. HTH!
Can you use regular paper from a printer or does it need to be scrapbook quality paper
I’ve never used anything but the scrapbook paper, so I’m not sure….regular paper might be harder to work with and keep from getting wrinkled with the mod podge….
how long does the modpodge take to dry? can i do this in a 2 hour class for kids?
I waited about 10 minutes between layers, so I think it should work. You also have to wait in between layers of spray sealant…I think it said longer on the can, but I just waited a couple of minutes. HTH!
Hello!!! I purchased the .16 tile yesterday at Lowe’s so they still have it. What I am wondering is if you sanded the sides where there is 2 bumps per side??
so sorry not to get to this earlier; we’ve been out of town! I don’t remember whether there were bumps on my tiles or not, but I’m positive I didn’t sand anything down. It’s been awhile, so it’s possible the tiles have changed….
You can get the clear sealant at Walmart. I Use KRYLON triple thick clear glaze. I use 2 coats of this on top of the modge podge ( yes you need the sealant) . For the sticking problem I went to Auto Zone and bought a can of clear engine sealant. 2 coats of this then bake to cure. No more sticking coffee cups,no yellowing.
I think someone else mentioned the Auto Zone solution awhile back as well. Thanks for the tips!
oops…the way the comments show up I didn’t notice that you were replying to someone else. Anyway, thanks for jumping in 🙂
when you bake them to cure you may get little bumps on them. This is ok since it helps keep the cold drinks from sliding off.
I tried this, and after drying 24 hours, when I put my mug of coffee on the coaster, and it made an indent. Do I need a second coat?
hmm….maybe! I’m not sure if that’s the problem or not (I didn’t notice this problem with mine), but another coat couldn’t hurt!
I picked out some really cute Christmas wrapping paper to do this project.. As soon as I spread the mod podge on it wrinkled. Anyone else have this issue??
I’ve had that problem with mod podge with other projects. In my experience, it’s easier to work with mod podge if you have thicker paper like the scrapbook paper. Sorry you ran into trouble!
Is there such a thing as too much mod podge?? Mine is taking forever to dry. I loaded up on it first set. Wondering if a lot will be better or worse?
Hmm…not sure. I do remember thinking I’d put so much on that it was never going to dry clear….but it always has. That said, I can’t remember anymore how long mine took to dry.
Do I have to let first set dry before my 2nd coat?
I would. I’m not sure if it makes a big difference, but I’d be afraid it would get too goopy otherwise
Thank you!! Can’t wait to see how they turn out!
good luck!
I’ll be participating in an event next week. I needed something to add other than just trying to sell or promote my product. I think this will be a great gift to make in advance and give away. Really cute idea. Thanks for sharing.
Glad it helped….hope the event goes (or went) well!
What did you do about the sharp edges on the tiles? I bought some and the edges are really rough and ive heard its very hard to file tile down.
ooh, that’s too bad! I don’t think our tiles had particularly rough edges….it’s been quite awhile, but I know we didn’t file them down.
Have made some of these coasters. Home Depot has the tiles for 8 cents each. I’ve put felt on the back instead of cork. I live in an apartment, so I spray then leave for a couple hours. Smell is gone when I get back. Really enjoy this craft. Thanks.
8 cents–wow! that’s a deal!
I LOVE YOUR humor. Oh my I enjoyed your tutorial so much. You think and do that same as I do! Love it. Thanks for tutorial.
Thanks so much for reading and for the lovely comment–brightened my day! 🙂
Hi Gretchen! I also found 4×4 tiles for 8 cents at Home Depot. I just started trying these with good scrapbooking paper and got bubbles/creases in the center. Am I not using enough Modpodge? Too much? Thank you!! Annie
Honestly, I’m not sure….I don’t remember any problems with bubbling with mine, but it’s been a long time now! I can say that this may be the only mod podge project where I didn’t have bubbling troubles, so maybe I was just having a lucky day….
Thanks!!! My coasters are amazing!!!
Great to hear!
Hello! Just wanted to tell you I did mine with the names of my co-teachers, what I used was letters from the magazine cut up each letter and in different colors and it came out really cute, i wish I know how to attached the picture. Made only 2, name and last name bought the tiles in Menards for 15 cents. I used felt at the back. Now i wanted to get any idea how to give by itself or with something.
Also before my daughters 14th bday, i used a notebook, get picture of the kids during the party then had it printed and the used it as notebook cover. Enjoyed making it.
Sounds very cute! Glad it turned out well!
I absolutely love this idea. However, I went a step up and made trivets for my friends group. In addition to the spray sealer, I used Rustoleum High Heat ceramic soating. Thanks for being an inspiration!
sounds awesome–thanks for telling me about it!