
post contains affiliate links; thanks for supporting Boxy Colonial!
Dave is here to tell us how he made the farmhouse table. He has a lot to say and show about it. My finger hurts from editing all the pictures. Not even kidding. If you want to make a farmhouse table, you won’t find a tutorial more thorough than this one!

OK. Dave here for another installment of how to make passably decent stuff out of wood. I’ve been planning on making this table for the kitchen since before Thanksgiving. I finally did it over summer break. As Gretchen mentioned in the other table post, we spent a long time looking at other plans for tables. My problem, it seems, is that I keep getting distracted by our hectic lives and/or discouraged about the lack of a particular power tool and/or unable to bookmark the perfect plan when I come across it, so I ended up essentially making this up as I went along. And, as I mentioned, I came out with a passably decent table.
First off, the dimensions. Our old kitchen table was too short to put two chairs on the long side comfortably. With a household of 6, we needed a longer table. But the eat-in area of the kitchen isn’t big enough for a crazy long table. So after much debate, measuring, and researching, we decided that the perfect length would be 60 inches – long enough for two chairs per long side and short enough so that we can actually fit the chairs at the table without banging into the walls. Only eight inches longer than the old table, but it was enough. So here’s how I built a 60″x29″x30″ farmhouse table.
Shopping List
| Qty | Item | Unit Price | Total |
|---|---|---|---|
| 2 | 12′ 2×4 | 5.38 | 10.76 |
| 2 | 10′ 2×4 | 4.44 | 8.88 |
| 2 | 10′ 2×8 | 7.57 | 15.14 |
| 1 | 8′ 2×8 | 5.78 | 5.78 |
| 2 | pack of 3/8″ dowel plugs | 1.46 | 2.92 |
| 1 | 50 ct 2 1/2″ Kreg Screws |
5.21 | 5.21 |
| 1 | 26 mm furniture glides | 2.48 | 2.48 |
| 51.17 |
Cut List
| Qty | Item | Use |
|---|---|---|
| 2 | 54″ 2x4s | long apron |
| 2 | 25″ 2x4s | short apron |
| 2 | 22″ 2x4s | supports between long aprons |
| 2 | 29″ 2x8s | bread boards |
| 4 | 45.5″ 2x8s | top boards |
| 8 | 29″ 2x4s | legs |
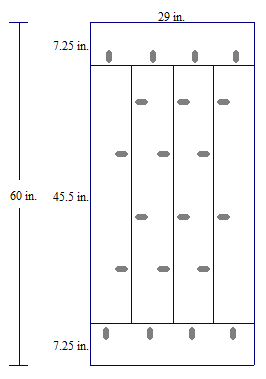
There’s a diagram of the table top from beneath. Those ovals represent evenly spaced pocket holes attached with a Kreg Jig. As shown, each of the four 45.5″ boards have two pocket screws attached to its neighbor. Given the length and weight of these boards, it might have been safer to use more. Now that it’s attached to the aprons it’s fine, but I was worried the screws might get ripped out before I finished. I also used wood glue to strengthen each seam.

We started out by aligning the four boards in such a way as to minimize the gaps between them.

We glued and screwed the four top boards, then made a nice clean cut on both sides to make the desired 45.5″ length.

We then glued

and screwed some more, this time for the bread boards.

Here is a close-up of one of the pocket screws.

This table top is crazy heavy. This was one of the times when I feared the screws wouldn’t hold. But they did!

Behold, the assembled apron. You can’t see them, but there are 16 pocket screws holding it together.
Of all the decisions that went into this construction, the hardest one was how to make the legs. I thought of using 4×4 posts, but I couldn’t find any that were untreated. While the legs would be coated with polyurethane and would have probably contained the noxious fumes well enough (?), it still made me a little nervous. Also, the treated lumber would be a different color! I entertained the thought of simply buying pre-built table legs, but Gretchen thought that that was lame. Also, I think they were $10 a piece, which would have significantly affected the total cost. I finally decided on stacking two untreated 2x4s together to make the illusion of a 4×4 post. It wasn’t until I saw it and thought “Huh, that doesn’t look square like a 4×4” that I remembered that the length and width of a 2×4 aren’t really at a ratio of 2:1. Not a huge deal, but it’s a little bothersome.
Anyway, I didn’t want the legs to be nested inside the apron. The table was already pretty narrow and I didn’t want to sacrifice any of the stability by moving the legs toward the center. It probably would have been fine, but I decided to notch out one of the 2x4s so that the leg would join flush with apron.
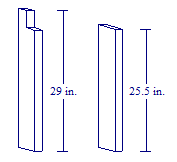
Each leg consists of these two boards. The difference in height of 3.5″ matches the height of the 2x4s of the apron. The width of the notch is (supposed to be) one half the width of the board, or 1.75″. More on that in a bit.

The notches were cut out first by circular saw, then by jig saw. The less-than-flush cut made by the jigsaw made the seam between the leg and apron … less-than-flush. We might cover those up with fancy industrial-looking brackets in the future.
I got to pull out my Father’s Day gift of countersinking drill bits here. Four countersunk 2.5″ deck screws per leg, a healthy amount of glue, and the wood plugs and the legs were done.

A post-stain picture.
The distressing was pretty fun. We used both sides of some hammers, the sides of a screw being wacked by a hammer, and this metal right angle frame for drywalling that is for some reason in the basement to get just the right amount of destruction.

Milo and Gus got the idea.

Ari doesn’t like loud noises, though.
We thought it’d be easier to sand and stain before assembling the legs, apron frame, and top. But sanding is so boring.


Unless you’re Gus. Then you get into it.

Since the table was clearly going to be very heavy, I decided to assemble the pieces in the kitchen. So after Gretchen stained all the parts, I brought them to the kitchen.

There were many right angles to verify. Once the leg was positioned I used three countersunk 2.5″ deck screws to attach each leg to the apron – one screw into the long apron and two into the short, sunk into two sides of the leg notch.

Rotate and repeat.

While it may be hard to see in this picture, this is when I realized an aesthetic problem.

Here’s a close up of one of the legs and how I didn’t do so well cutting that notch at exactly 1.75″. Close, but no cigar.

Fortunately, the trusty Ridgid Multi-tool could fix my sloppiness.

After much wood shavings and sand paper, all four legs were more flush to the apron than before.

Much better! Good thing we had leftover stain.
Next, to attach the top. Careful measuring to make sure the countersunk screws didn’t miss the apron … there was a 2 inch overhang and the narrow side of a 2×4 to hit the middle of. So 2 inches plus half of 1.5 inches gives you 2.75 inches.

Three countersunk screws evenly spaced on each of the four sides of the table

a few more wood plugs, and a bit more stain and you’ve got yourself a table.
Slap on the polyurethane, attach some threaded furniture glides to the legs, and sit down to eat!
Update: The table turned out a bit wobbly, which makes me sad. I think my notched leg construction was not the best idea. I thought of adding a diagonal brace inside each apron corner – you know, like real tables – but decided to try reinforcing with a few extra screws going from the legs up into the bottom of the table top. Here’s a few of the underside – two screws per leg. That has made a significant difference for now. Hopefully forever.


Linking with:
The Creative Connection
The Shabby Nest’s Frugal Friday
Miss Mustard Seed’s Furniture Feature Friday
The Inspiration Gallery
Monday Funday
It looks awesome! I’ve been wanting a farmhouse table for our kitchen, but I don’t think Kai’s up for making his own. I did find them from a carpenter that charges a reasonable price though. Just wish they were local.
Yes, I can’t imagine how much it would cost to ship one of these–so heavy!
Such a great tutorial! You could go into business and sell those solid wood tables for thousands 🙂
We’d need to make thousands, with as long as it takes us to make one of them 😉
Love your tutorial. And that table is just spectacular. I love the … bread boards? Is that what the end pieces of wood on the table top are called? It just makes the whole tale look so finished and fabulous. Love the stain color. Oh and the team of distressers: Total pros 🙂
And Dave: total keeper 🙂
yep, breadboards! I don’t know why–we pretty much never put bread there 😉
WOW! What an awesome table and tutorial! I am so, so impressed! I popped over from The Creative Connection– thanks for sharing!
~Abby =)
Thanks, Abby! And thanks for stopping by 🙂
A beautiful, family made table! Is there anything better than this! The place where we spend so much time and now yours has so much meaning! It is gorgeous friend! High fives to your husband and kids!!!
Thanks, Nicole!
Love this table! Sorry to hear it is(was) a bit wobbly – that’s no fun. But hopefully your fix holds it steady. It looks great!
Sarah
Dave was just sitting at the table and commenting that it’s not wobbly at all anymore 🙂
I love the table and love even more that you got your family involved!! What a wonderful memory for them to have and be proud of!
Thanks! I love how the blog means we have documentation of all the kids with tools, too 🙂
I am looking for a good tutorial to make a dining table for weeks now. Looks like I finally found one! Thanks.
oh, I’m so glad–hope it helps! Send me a picture when you make one 🙂
Your table is gorgeous! I’m hosting a Wall Decal giveaway that you should enter! http://homecomingmn.blogspot.com/2013/08/wall-decal-giveaway.html
Just bought my boards for a slightly wider version. So excited! Only cost $12.35 with gift cards from Shop Kick scans. $20 for normal shopping activity.
yay! send me a picture when you finish it! 🙂
If you’re still having trouble with the table being wobbly try adding corner braces. you can make the out of 2x4s and a miter saw. Cut the length of the braces so the it barely touches the leg. Use wood screws into the aprons, but use lag bolts and washers to go into the legs.
Thanks, Kevin! Corner braces were going to be our next step, but the extra screws we added are still keeping things nice and non-wobbly 🙂
I’m verrryyy new to woodwork. I saw this tutorial and jumped on it, and am currently making it in the garage. I have a little hangup though…. after putting all 4 top boards down (2X8s which are actually more like 2X7.5s) my 29 inch bread boards were one inch shy of the width of my top boards. I got all my cuts from the list you made, I’m not sure if I did something wrong or if there is a typo in the list? Not a huge issue, I’ll just go back and get more wood cut at 30 inches. Just was curious if I missed something….
Hi Eric–We did some measuring….our 2x8s are 7.25 inches, not 7.5, so that would account for the one inch discrepancy. We did some googling, and the 7.25 size appears to be the standard (http://www.engineersedge.com/commercial_lumber_sizes.htm), so not sure why yours were a little bigger. At any rate, hope things go smoothly once you get the longer wood for the breadboards! Would love to see pics when you finish 🙂
I was wondering what kind of wood you used for the top? Is it just your standard construction grade 2 x 6’s?
Thank you
It’s just the cheap whitewood from Home Depot. We used 2 x 8’s. HTH!
did you have any trouble with the top warping over time?
Nope….it’s stayed nice and flat! The only issue with it is food getting caught in between the cracks. We blow it all out with compressed air every now and then.
I don’t know if I missed them.. What are the end dimensions of the table?
The top is 29″ by 60″….do you need any of the other measurements?
Hello, I live in a small apartment in the basement. I was wondering if this can be built so that the table top can be removed for moving and then put back together at the next destination?
Sorry, I missed this before somehow! Hmm….the screws that hold the tabletop to the legs are all accessible; I would think it would be pretty simple to remove it. I don’t know that you’d want to do it over and over again, since the screw holes might get stripped, but once should be fine. HTH!
If you use something called a figure eight to connect the top to the frame you would be able to remove the top instead of having to disassemble the legs. This would also eliminate the need for plugs on the top.
Thanks for the tip!
Supplier’s descriptions -Figure 8 fasteners are a fast and secure way to attach table tops to table aprons while allowing for seasonal movement. -Stamped steel “figure 8” desk top fastener to mount desktop to pedestals.
those look pretty neat 🙂
I noticed that the Kreg screws should not had been screwed into the breadboard and ending up in the ends of the top boards. The screws will not hold as designed as it is will have nothing to grab going into the ends of the top boards. Instead the screws should have gone into the top boards to end up in the breadboards. Kreg would have had you drill the pocket hole in the top boards.
Hi Will–I see what you’re saying…I can’t remember anymore what the thought process was when we put the screws in that way (if there was one; it was an early furniture build ;))….but I can say that it worked out okay, because the table’s still holding up really well 3 years later :).
bought almost identical at an auction almost 15 years ago.. except it has inlays on the top came with 8 chairs its covered with table cloth .. am considering chalk paint .. bare wood i know its pine any suggestions
I think chalk paint could look really nice! I guess my main advice would be to make sure to do a good top coat–we put a ton of polyurethane on ours and it’s held up great to a lot of abuse 🙂
What color did you use for the stain? It looks great!
Thanks, Kari! It’s actually a custom stain–I mixed together Cabot Gray deck stain and Dark Walnut. I talk more about it here: https://boxycolonial.com/farmhouse-table-easy-one-month-long-project/
I just wanted to tell you that I followed your plans and modified just the dimensions ( 36″ H, 20″ D, 72″ W) in order to make a dining bar for my tiny kitchen. I absolutely love it!
yay–that’s great to hear! thanks so much for the comment 🙂
Great project. I’ll borrow a few things from this for my project table, thanks. One thing to keep in mind. Don’t screw into end grain next time, make pocket screw hole behind end grain and into breadboard. Thanks, and nice tutorial.
Thanks! I think someone else mentioned the same issue a few comments back…we’ve gotten lucky and it’s held up fine, but we’ll keep it in mind for next time!
Pingback: 17 Rustic DIY Farmhouse Table Ideas to Bring Country into Your Home – My Decor
How is the table now? Any cracking? I just did a table top breadboard style and after I cut the boards I read in a woodworking book this style is bad because of shrinkage & swelling. We ended up tongue-grooving the end boards on, with only 3 screws so it’s able to move. (I had a retired shop teachers help). These tables are beasts, will have to assemble in dining room too.
nope, no cracking! And it’s been outside for the last several months (on a covered porch) and still no problems.
Your awesome I watched your steps read all of it and I enjoy building things myself. Thanks for the tutorial, great Job!
Thanks, Michael!