


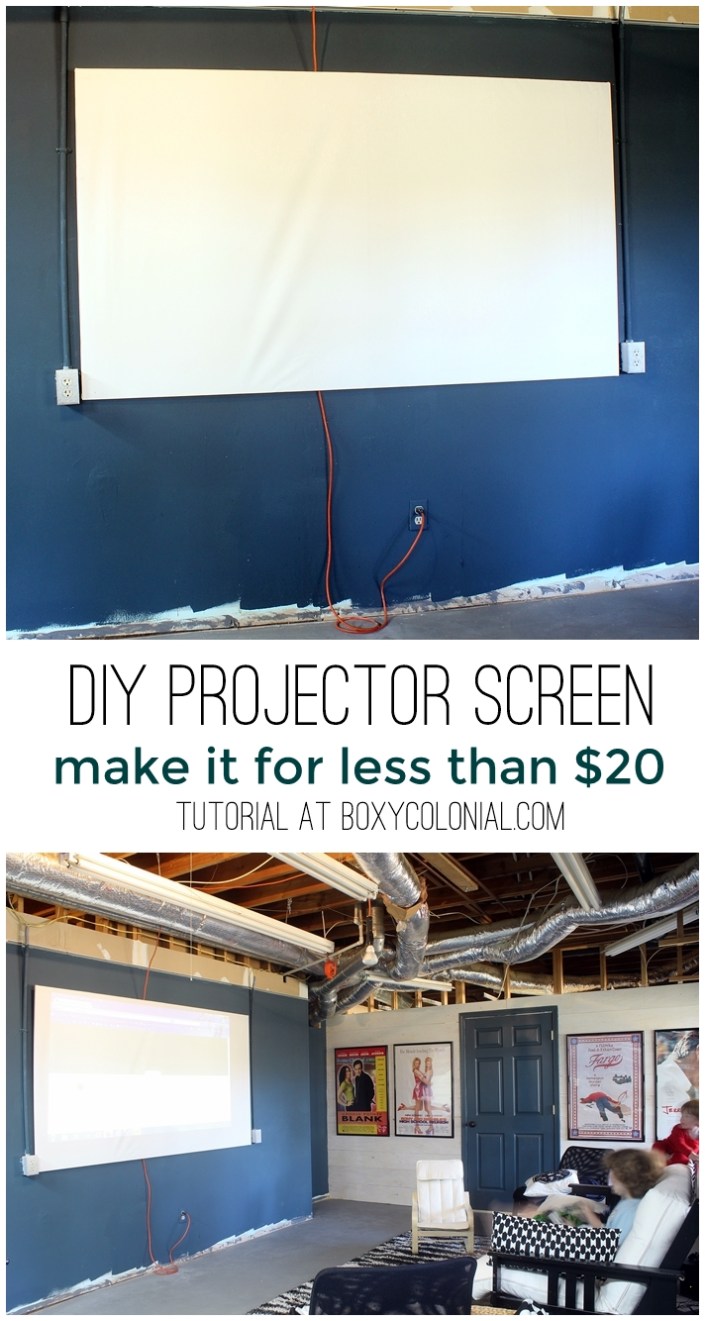
Today I present easy to follow instructions for making your own DIY projector screen!
I have to say, the whole process of buying and setting up a projector is, for me, very mysterious and difficult to comprehend. I feel like the more I read about it the less I understand.
So I came across a lot of tutorials out there for making projector screens for “under $100” or “only $150” or whatever. Probably those screens are way nicer than this one, but, luckily for us, we are so ignorant in the ways of projectors and home theater set ups that we don’t know what we’re missing.
But if you’re looking for a cheap, easy, basic projector screen I’ve got just the tutorial for you. It’s really only under $20 if you have scrap wood lying around that you can use. Otherwise you might spend another $10 so buying thin, lightweight wood or MDF.
Here’s What You Need: (with some Amazon affiliate links; doesn’t cost you anything extra, and Boxy Colonial makes a few cents if you buy through the links)
materials:
*scrap wood about 1/2 inch thick OR buy lightweight wood or MDF (I found these MDF boards at Home Depot for $2.66 each; you’d need 3 to make a screen the same size as ours)
*a little more scrap plywood for the corners
* corner braces (we got ours at Home Depot, but they look like these)
*white/white blackout fabric (we got ours at Michaels, and it was marked 50% off. We paid $12 and change for 3 yards)
*short screws
*picture hanger of your choice
tools:
*miter saw or saw and miter box
*we used the Kreg Rip-Cut and circular saw to rip the scrap wood we were using into thinner planks; you won’t need that if you buy new wood or mdf because you can just get it the right size already!
What to do:
1. Figure out how big you want your screen to be. We were actually going to make ours a little bigger, but then…see those outlets that come down on either side of the screen? Those don’t even work, but we’d like them to someday, so we decided to make the screen fit in between the two to make it easier to hang. We went with a 16:9 aspect ratio, which is the standard HDTV ratio (there are lots of complicated things you can read to try to help you decide what aspect ratio you want. I recommend the google for finding them). So our finished screen is 80 by 45 inches (the blackout fabric is 54 inches wide, so that limits how tall the screen can be (don’t forget to leave an allowance for wrapping the fabric around and stapling)
2. rip boards as needed and cut down to size with 45 degree angles. We were using wider boards (we wanted them to be just a couple of inches wide) from past projects (some leftover plywood from our plank wall and leftover mdf from our board and batten), so we used the Kreg Rip-cut (part of the DIY project kit Kreg sent us awhile back) to rip them down to a more manageable (and lightweight for hanging) size. I talked about it more in my post about our plank wall, but basically the Rip-cut attaches to a circular saw to help you make cuts to sheet wood more precisely and quickly than you could otherwise:

3. attach boards together in a rectangle with the corner braces:


4. cut down scrap plywood at 45 degree angles and attach with screws to reinforce each corner:

(our screws were a little too long, so we had to dremel them down where they poked through on the other side so they wouldn’t tear the blackout fabric)
5. Wrap blackout fabric around the frame, stretch it as tightly as you can, and staple into place with the staple gun. We put the frame up on two big cardboard boxes to get the fabric around it….it’s easier if you get it up off the ground on some kind of big work surface like that. I did the corners by folding in a V right on the corner first, then folding the slack over the V on each side….like wrapping a present. Don’t be afraid to pull it as tight as you can get it. You can see a place where our screen has a little wave in it; you don’t notice it when you’re watching something on there unless you’re looking for it, but it’s still annoying, and I wish I’d pulled tighter! BTW, your blackout fabric will have a shiny side and a more rubbery side…the consensus I found online was that you want the rubbery side facing out (i.e. that’s what you want the image projected onto). This seemed counter-intuitive to me, but….the internet never lies.

6. Hang it up like a big old picture frame. We strung a wire across the back, but I imagine other kinds of hangers would work just as well.
7. Watch movies. We’re thinking of Ghostbusters this weekend.

The new basement room is getting a ton of use so far. The kids like to play video games and watch TV on the projector, and they come down here to read and do school and stuff, too. And, of course, Rory can’t be without his boys–but I don’t want him on the white futon cover–so we bought a dog bed for down here, too:

Linking with:
Very cool! Great job guys!
this is awesome! great idea- you guys are so smart!
It’s hard to say no to $20! Looks great!
Yep you guys are crazy awesome! I can not believe you whipped this up for that price it looks so fantastic!!! And you have the most perfect wall for it there! Your space looks so wonderful Gretchen!!! Happy weekend Pal! Nicole xo
I’ve always wanted one! A screen and Rory 😉
They really go together perfectly 😉
This is so smart and inexpensive! Love it.
Thanks, Sarah!
Awesome! We all want to know how Ghostbusters was. Spill.
We didn’t watch it! They were playing some game on the screen and didn’t want to stop! Maybe next weekend….
We often float the idea of doing a projector screen somewhere, but just don’t have the space for it. Love how you made yours. I’ll be sure to show Frank. He will be jealous 🙂
Before we decided to use the basement, we thought about doing a roll up one over the archway in our library. The projector was in the way in that room, too, though
this makes me miss our basement movie room really bad. I’m sad without our projector 🙁
This is totally impressive, Gretchen! I can’t believe you guys made your own projector screen and saved so much!!! When can I come over for a movie night? 😉
Any time! I think we already decided on Fight Club, right? 😉
You win at the BEST EVER PROJECTOR SCREEN. I would love to have one of these.
you should make one for the first floor of the barn! that would make a great theater room 🙂
Pingback: How To Host A Winning Super Bowl Party - Porch.com
SO COOl. what are you using to project the image onto the screen though?
We actually bought a projector (from Amazon…it was about $300 if I remember right) about a year before finishing the room in the basement….for awhile we just pulled out a screen made from blackout fabric and hung it up across a doorway whenever we used it. The permanent screen’s a lot more convenient!
I am looking to do something like this for our backyard, but I don’t want it permanently on our garage due to the elements. Is this fairly light weight to take down and carry into our garage for storage?
It is! I’d say definitely under 10 pounds.
Pingback: DIY Projector Screen for less than $20 - A Little Craft In Your DayA Little Craft In Your Day
We made one to use outside in the summer and when when we are camping. Paid a little more cause we use PVC pipes for a frame. Very mobile.
That’s a great idea! I keep thinking about doing an outside one, but we haven’t gotten around to it yet….
Great idea!! Now I just need a projector! I’ve always wanted one, but they are so expensive! Definitely pinning this, because one day I will find a deal on a projector!
Thanks! I saw a lot of used ones on Craigslist before we bought one….I just worried about the expensive to replace bulb burning out, but might be something to look into!