
Turns out it’s both easy and inexpensive to make your own DIY backyard fire pit.
Our yard is very big (we have a half acre lot) and very empty. We have the only non-wooded lot in the (small) neighborhood. The story we got from neighbors is that a tornado a few years back hit our house and took out a bunch of trees, and the former owner went with clearing out the whole backyard as the least expensive way to clean things up.
It’s a huge change from the super wooded lot at our old house. I’m excited about the possibilities involved with gardening with the help of actual sunlight, but truth be told the totally empty yard was kind of….boring. It’s not even especially useful as a flat surface for, like, sports and stuff (you know, if we were a sporty people), because there are all kinds of surprising dips and holes where trees used to be, excellent for spraining ankles.
We have a dome climber like this one: (affiliate link)

I thought it would get more use from our older kids than a swingset, and then I found a great deal on one on Craigslist and snatched it up. So picture a giant, flat, grassy yard with a dome climber in one corner. That’s what we had.
Until today!
We had a cheap little metal fire pit from Wal-mart or wherever that we used on the driveway at the old house. The kids have always LOVED having fires (and the accompanying marshmallows); firepit evenings often started with marshmallows and ended with kids running around catching fireflies and all that sort of thing. So idyllic!
So I knew I wanted a more substantial/permanent/pretty firepit here. I did my usual Pinterest research:
http://www.diynetwork.com/outdoors/8-easy-to-build-fire-pit-designs/pictures/index.html
http://www.thisoldhouse.com/toh/how-to/intro/0,,1636191,00.html
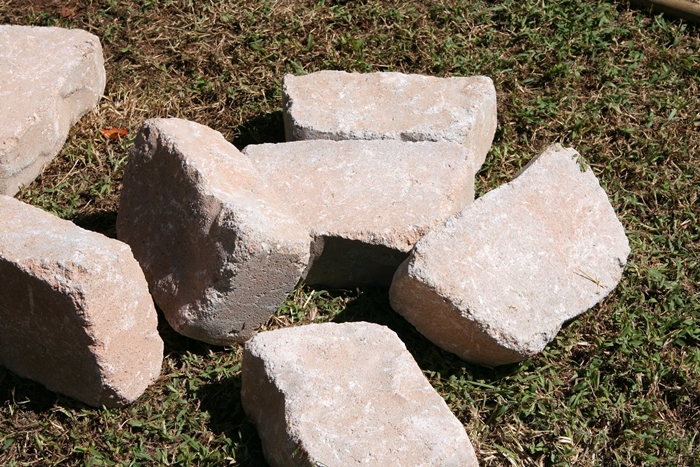
And settled on this $30 firepit from Always Chasing Life as my primary inspiration.
Ours was more than $30, for a few reasons. For one thing, we lacked a nice patio to put it on, so we decided to clear out a circle in the yard and put gravel down first. And we wound up with slightly more expensive stones, for reasons that I will reveal as our story continues.
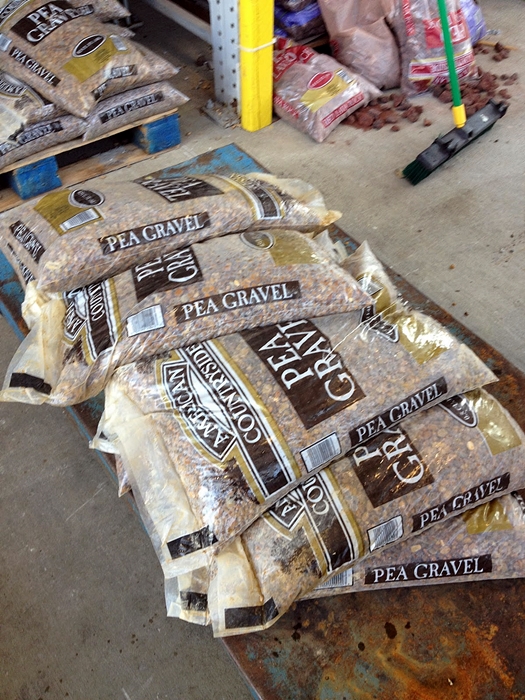
Okay! Firepit weekend arrived, and we headed off to Lowes, where we discovered that they were having a 20% off sale on landscaping stones! What luck!

We picked out this pea gravel to use as the base. We wound up with 22 bags (and could probably use a couple more for better coverage) at $3.37/bag (after our 5% Lowes card discount), already blowing a $30 budget out of the water. But cheaper than a patio!

….but then Dave did some fancy mathematical figurin’ about radii and whatnot and decided that we could make a smaller circle by buying the more expensive (but also prettier) flagstone. In the end, we decided that the castle block would probably have been fine; Dave didn’t really think about how in firepit building, unlike in geometry, you can play around with the spacing between the blocks and make circles smaller with barely noticeable aesthetic ramifications.
I’m glad we went with the flagstone, though; I’m very pleased with how it looks.
I’m conflating various Lowes trips, interrupted by sleep and eating and birthday parties and August’s performance as Colonel Hathi in The Jungle Book, for the sake of the narrative. Had we bought everything at once, it would have killed the minivan, I think. In the end, though, we bought 22 bags of pea gravel and 30 flagstones, at $1.86 each.
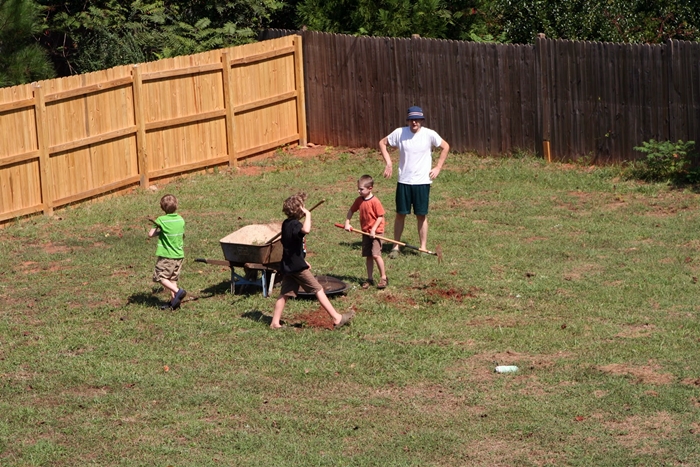
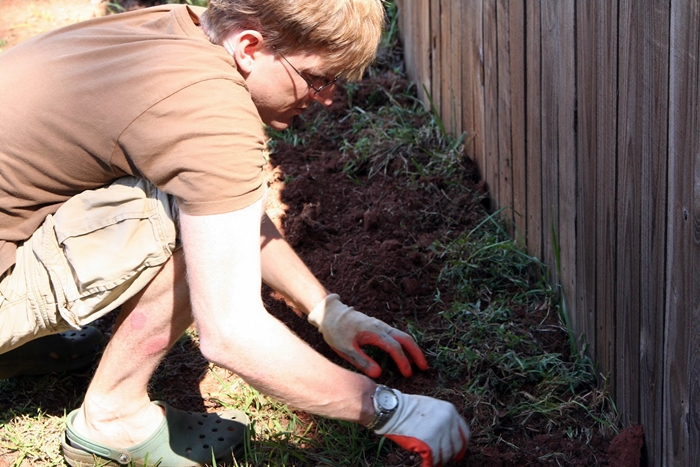
We came home with all the stuff and set to work. We even had an extra kid over for the afternoon, so we got him going with some manual labor, too:
Helping!
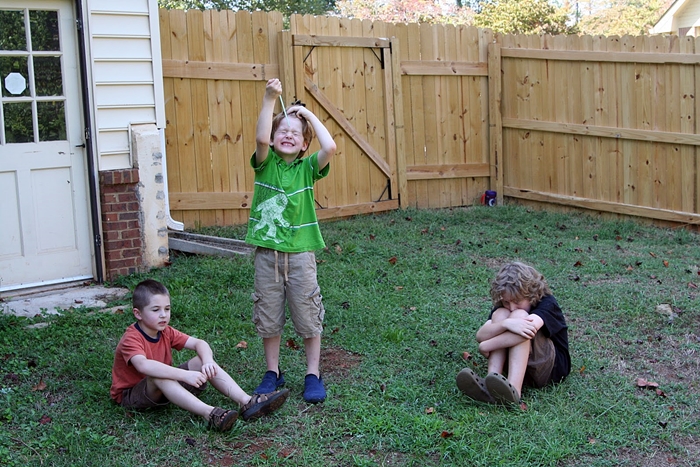
Resting!
By the way, see that fence? My husband built that fence all by himself! Well, my brother helped with digging the post holes. But, mostly, all by himself. Which took a long time and was a sucky job, and saved us a bunch of money, and looks AWESOME. Go Dave! (not that crappy fence along the back; that was already there. That’s the fence The Beagle sneaks out under whenever she gets a chance. Not Dave’s fence; it’s like Fort Knox, I tell you!)
Digging the circle was the most time consuming and unfun part. But then came….the gravel spreading!
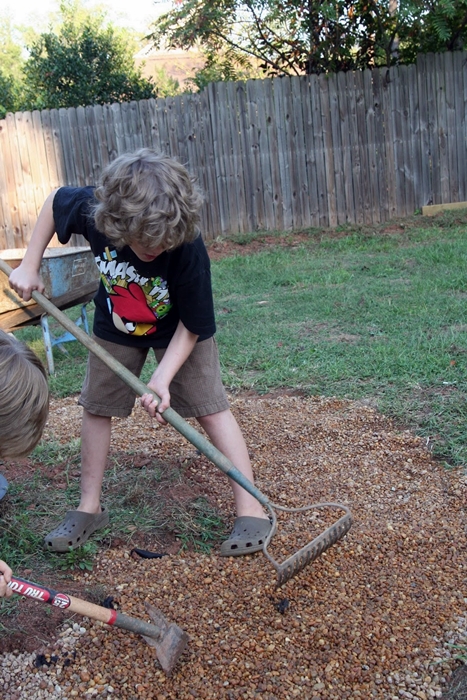
And then….the rock stacking!
Dave took all the dirt/grass he dug out of the circle and piled against the crappy fence for Beagle-proofing purposes:
I am, again, condensing for dramatic effect. The whole process took parts of 3 days, start to finish, although only a substantial part of the first day. It probably could have been completed in one long day, had that been absolutely necessary. Really, the part he did today took about 15 minutes (finishing stacking the stones from the last minivan-load).
We opted for cheapo plastic Adirondack chairs. We wanted 6 of them, and paying for six nice chairs just wasn’t going to happen. It being the end of the season and all, white was the only color Lowes had left. We have big plans to spray paint them and make them more beautiful, though. Sometime.
The finished project:
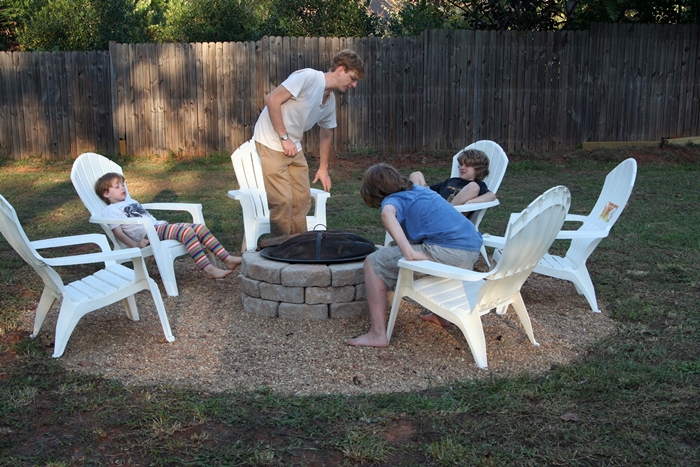
And here it is in action:

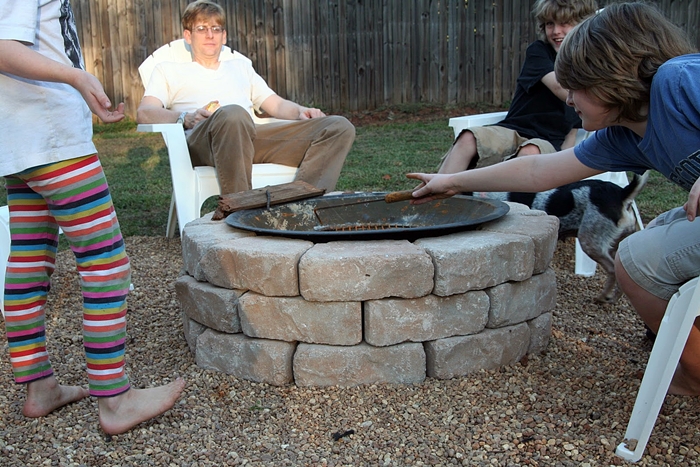
Fire! Pretty!
So there you have it. Total, more than $30, cost: $129.94 for the gravel and flagstones, plus another $102.48 for the Adirondack chairs.
Editing to add…..the metal bowl is just the bowl from our old firepit, recycled. In case anyone was wondering 🙂

See more of our backyard projects:


Linking with:
Summer Spruce Up Series
I was actually thinking of putting a bowl over our fire pit as well. It would be easier to clear the ashes that way, and you can have a higher flame even with little firewood. After seeing how great it looks here, I’m definitely convinced – I’m getting on with it! 😀
Awesome fire pit!!! It looks like you all had a blast making it! Thanks for linking up to our Summer Spruce Up Party!
Restoration Beauty
Thanks, Selene!
I love your firepit:) Great family gathering place.
Thanks, Cathy! We have a lot of fun out there 🙂
Our big spring project this year is going to be adding a firepit… thanks for your tutorial and inspiration!
Krista
Good luck with yours! We really love ours–definitely worth the effort 🙂
lovely fire pit! Where did you get the metal bowl shaped piece?
Thanks, Joan! We actually had an old store bought firepit that we were able to recycle the metal bowl from. You might be able to pick one up cheaply from craigslist just to get the metal bowl; the lower end ones aren’t too expensive new, so if you can find a used one, I’m guessing it’d be very inexpensive.
Did you use anything to hold the stones together like stone adhesive? And is the recycled bowl just set in or did you use something to make it stick?
nope–super simple; the stones are just stacked up (they’ve held up well for a year and a half now) and the bowl is just sitting on the top. HTH!
Love it! 🙂 Great job! 🙂
Thanks, Fawn–and thanks for the inspiration (we built it over a year ago when I’d just started blogging, but it’s suddenly taken off on pinterest lately :))
This is a fantastically helpful post! My one question is how big did you make the circle?
Do you mean the fire pit itself or the pea gravel? anyway, I sent the kids out to measure, and I have them all for you :). The firepit is 29 inches (diameter) on the inside rim and 37 across the outside. The gravel circle is about twelve feet in diameter.
why did you put a bowl on the top? did you fill the pit with stones under the bowl? I’m thinking of doing the pit with no bowl, which should work, right?
I think you could absolutely do it without the bowl and it would work just fine. The bowl makes it a little easier to get an impressive looking fire with less wood, since it’s higher up, but I don’t know that there’s much advantage aside from that. We happened to have the bowl from an old firepit already, and the ones we were looking at online mostly used a bowl, so we put it in there.
Did you put anything under pea gravel to kill any remaining grass roots or weeds? Just wondering if that’s am issue for you now?
We didn’t put anything under it (just dug up the grass), and it has been a minor issue, but not a huge deal. This will be our second summer with it: last year we just pulled up the weeds at the beginning of the season, and it stayed pretty clear after that. This year we’ll do that again (in the next few days, I hope!) and then probably buy a couple more bags of pea gravel to fill in some of the barer looking spots with. HTH!
Do your chairs sit ok on the pea gravel? I am wanting to do something like this in our back yard but worry that the legs of the chairs will sink in the gravel, or be unstable.
We’ve never had any problems with the chairs on the pea gravel. A lot of it’s worn away over the past couple of years, so we’re in the process of redoing it–and we went with pea gravel again 🙂
great idea, and it is nice that it has stood the test of time.
Thanks, Karley! Definitely still one of our favorite parts of our yard 🙂
How many pavers did you actually use.
We used 30
I was thinking that would make a nice flower bed. We lost one of our big pecan trees during a hurricane several years back, but still have the azalea that grew close to it. I could put seasonal flowers in there too. I’m going to go measure! Thanks for the inspiration 🙂
Sounds pretty–great idea!
Pingback: DIY Backyard Fire Pit : Useful Ideas
Thanks for sharing! I’ve been telling my friend she needs a firepit in this lovely circular garden area she just resurrected but she hasn’t wanted to spend the bucks. This is a great tutorial!
Thanks so much! We’ve gotten a ton of use out of ours; it was definitely worth the time and money 🙂
Pingback: the work of spring break (don’t worry, it’s fun!) | floridabondedpools
This is exactly what I want.. I also have the bowl from our previous fire pit. We plan on putting in tomorrow. How many blocks do you have on each layer?
We used 10 on each layer….have fun with yours!
What size are the flagstone blocks that you purchased? I see 8″x3″ and 12″x4″ online. The larger ones are almost double in price so I was wondering if you used the smaller size. I would love to build the same thing amd wanted to get an early start. 🙂 thanks.
I just went out and measured, and ours are 11 by 7….so sounds like a different size from either you’re looking at, but definitely not the smaller ones. sorry!
Thank you so much for measuring for me and also for the fast reply. That is perfect. I just wanted to have an idea so I can make mine the same size as yours. 🙂
My son has been wanting to put ina fire pit. I could not picture it in our yard, but after seeing yours, I can now see it. Simple, and inexpensive. Thanks!
Thanks so much for stopping by, Jo! We’ve had a lot of fun with the fire pit–lots of bang for the buck 🙂
Pingback: Stay Warm And Cozy With These 35+ DIY Fire Pit Tutorials – Cute DIY Projects
The main part i wanted to know a bout was missing: what is the ‘bowl’ part that the fire is in?
It’s the metal bowl from our old fire pit (I did mention it, but it’s at the very end….I forgot to put that in originally, so I’d added it later). You could probably do it without the bowl, too. Or pick up a bowl cheap on Craiglist. The bowl is nice for keeping the fire all contained and keeping the rocks from heating up too much. HTH!
Love your fire pit. I’m in England and I am going to build a fi repot inspired by you. Thanks great easy to follow blog
Love your firepit!! Looking to build one myself finally and this is a GREAT idea! Thanks for sharing. : )
thanks, Dawn! Hope you’ll have as much fun with your firepit as we do with ours 🙂
I love your firepit. I’ve been trying to decide just how to do the groundwork and with your explanations, I think I can do it myself pretty quickly. I also like the bowl set on top to bring the fire up higher and nicer to look at. Thanks for the pictures; I’m following your tutorial to do mine.
Glad it helped! Have fun with your firepit–we still love ours 🙂
It turned out really nice! & for not having any of the materials $100 is a good deal. Awesome job! We built one a few years ago & now that I have a blog, I JUST posted about it. Check it out if you can 🙂 https://livelylittlehome.wordpress.com/2015/08/22/296/ It cost us $15 out of pocket. Cheers to a fun time around the campfire!!
Wouldn’t a truck rim be cheaper to use than buying a fire pit
Probably, but we happened to already have the firepit bowl laying around from the firepit we used on our driveway at our old house
Pingback: 39 DIY Backyard Fire Pit Ideas You Can Build | DIY Guide
We have a small backyard. Think we could do the same size blocks?
I would think so….the actual firepit really isn’t that big.
I love the crappy grape stake fence!!!! Its gorgeous! Why do you call it crappy? It looks like it has silvered over time, you can stain your side you know? if its on the property line, lol.
The problem with the fence is structural rather than aesthetic….it has lots of gaps under it that encourage the dogs to dig out, and a lot of the support posts are falling over or rotting. It just wasn’t built very well to start with and it hasn’t been maintained much since then.