post contains affiliate links; thanks for supporting Boxy Colonial!
You know, I don’t think I ever put it together before that we’ll be finishing Abe’s National Parks room (knock wood) the same year as the 100th anniversary of the National Park Service. We’re real good at planning that way.
Back when I put together the mood board for Abe’s room, I put this tent on there and mentioned that it would likely be the inspiration for a DIY project (although, assuming it’s well-made, I think the $74 price tag on this one is fairly reasonable if you’re not up for DIYing it). But it’s an easy project if you have a few basic tools and a bit of basic woodworking experience/eagerness to learn, and the price tag of making the tent yourself is so reasonable it’s practically FREE! I mean, pretty close.
We went with drop cloths because they had the right look and because the edges are all finished already, so no sewing.

Here’s what you need:
Materials:
two 4×5′ canvas drop cloths
six-seven 8′ 1×2 boards
eight 2 1/2 inch screws
Sixteen 1 1/4″ screws
stain (we used Minwax Special Walnut)
Tools We Used:
sander (though it’d be easy to sand it by hand, too)
staple gun (we have a fancy one that works with an air compressor, but this one I linked to would work fine if you don’t have such a thing)
What We Did:
1. Assemble two frames

a. Cut 1x2s – Two 4-foot and two 6-foot lengths for each frame
b. Sand and stain
c. Predrill two holes in each 6-foot board aligning with the location of the two 4-foot cross boards – careful to center the hole and keep drill bit perpendicular to wood
d. Screw four pieces together using 2 1/2″ screws
(Ignore the braces in the picture. More about them later):

2. Cut 45 degree braces for each of the eight corners (four per frame), sand, and stain. Predrill two holes on each brace where it will attach to the frame.
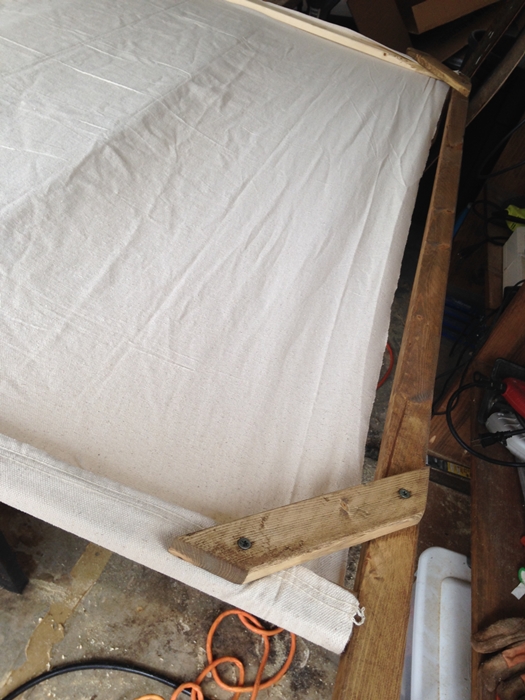
3. Stretch the 4’x5′ canvas across the frame. Use the braces to hold the canvas in place. Screw together with 1 1/4″ screws

4. Staple canvas in place every half foot or so:

5. Lean two frames together and tie them in place with twine.
We were originally planning to screw the two frames together, but we got a little nervous that the thin wood might split or that our drilling might be less precise than it needed to be. So we tied them together instead, which looks very rustic! We loosely followed this video to do (some approximation of) a diagonal lashing.


So a couple of things to note about this tent: it doesn’t collapse all the way. That would have been a nice feature, but we’d have to untie it all the way to get it to go flat for storage. It does kind of….compress. Enough that we could get it through the door.
Which brings me to the other point: this thing is BIG. It might not look so big if Abe’s room weren’t fairly small, but as it is it’s a pretty dominant feature in here. Good thing we like it.
But it did require some rearranging of the room to make it fit right. I thought we’d be able to put it in between the book ledges and Abe’s bed, but it just wasn’t working right there. So we ended up moving the dresser to that space, which freed up the whole corner between the door and the closet for the tent.
So here’s how the other side of the room is looking now (the bison will actually be hanging on the wall soon; we’re just waiting until we decide exactly how to center the dresser):


Linking with:

his room is INCREDIBLE, gretchen! i love the tent and i want to live in his room! will abe mind a roomie?
Of course–you can sleep in the tent! 🙂
I find myself weirdly unenthusiastic about a tent that’s permanent. In my childhood tents were temporary constructions of kitchen chairs and blankets. (Much more cave-like.) Would I have gotten tired of them, or at least less excited, if they were an everyday thing? Maybe, maybe not. I certainly didn’t get tired of the Christmas tree the year I was four and we had one up from just after Thanksgiving through my birthday at the end of January. In fact, now that I cut my own, I do that every year.
But it makes me want, even more, to find a place in this house to hang my hammock indoors. A hammock would be very park-like, too.
Abe makes a lot of temporary forts, too, mostly with his brothers :). I see this as a fun little reading nook (filled up with pillows, eventually)…but we’ll see how much it gets used. It was an inexpensive project, so if it’s only a short term hit, it’s not a huge deal. hammock sounds fun! In our case, it would probably lead to a lot of head injuries when kids dumped their brothers out of it, though 😉
🙂 When I have fallen out of mine it has been due to Surprised by Dogs.
ha! the hazards of hammocks….
Super-cute, Gretchen. I would’ve loved that when I was a kid. Maybe would even now. 🙂
Thanks, Rita! I wouldn’t mind a tent to hide in every now and then myself…
Pingback: No-Sew Children’s Play Tent
This is so awesome. My kids are still obsessed with tents. They’d love this too
Thanks, Julia!
This is an awesome DIY that actually looks doable!! Abe looks adorable reading (or on an iPad…I can’t tell) in the tent too. Bonus points for that.